0022 Architectural Sketching: The Basics
The Brief:
Welcome back Ladies and Gentlemen to the Architecture Student Diaries where it is my mission to help you kill it in Architecture school whilst making you, the best you in the process. So, why does everyone always say that to be a good architect it is important to be able to draw and sketch? Well, it is different in today’s world compared to the past as a building doesn’t get built off a hand drawing anymore; buildings get built off computer generated drawing sets and renders, right? Then why is drawing still important? Is sketching even needed in modern day architecture? Let’s start by asking ourselves: what is sketching? Oxford Languages defines sketching as “a rough or unfinished drawing or painting, often made to assist in making a more finished picture.” I agree with this, but I would like to add that for architects it is also a form of thinking, sketching is a way to turn an idea or thought into a physical thing; it is the inside of the tunnel where the entrance is your brain, and the exit is a final product. A sketch is a communication method to allow us as designers to express things that our words cannot, and this is exactly why we sketch; to communicate; whether this be a concept to a client or a flashing detail to a Head Contractor. As humans we know how important communication is, so from this you can understand how integral it is to learn how to sketch effectively. This class teaches the basics that will allow you to understand sketching and be on your way to sketch like an Architect.
Below is a breakdown of what we will discuss in today's lesson:
What You’ll Need
Different Types of Drawings
How to Draw a Line
Sketching Fundamentals
How to Make Your Sketches Look Better
Practice Makes Beautiful
Now, let’s get into it. Class is now in session.
What You’ll Need
In reality, all you need to sketch is a drawing utensil, (a pen, pencil, marker, etc.) and something to draw on; really, you could sketch with a stick in the dirt if you would like. But we’re talking architectural sketching so you’re going to want to be using the right tools for the job. I have two specific classes on Architecture School Essential Everyday Carry and Advance Everyday Carry, so check these out for a definitive list of items that will help you sketch like an architect, but for now the list below is a great place to start:
Trace Paper:
The architects go to canvas. Trace paper not only allows for great looking sketches, but also allows for layered sketches where you can use an old drawing, put a new piece of trace on top and use the below sketch as a guide to improve the original sketch or change the whole thing up. Trace paper is an architects best friend so go and grab yourself a roll.
Tip: Trace paper comes on circular tubes and these tend to roll off your table instead of staying still, to keep you trace where you want it when you buy a new roll, put it on the ground and stand on it so it isn’t perfectly round anymore; no more roll away trace paper!
Pencils:
For standard sketches use a simple grey lead pencil, they’re also great for guides before you do a final pass in something more permanent; feel free to use a mechanical pencil or an Architect’s clutch pencil if you prefer. To add a bit of difference to your sketches try out coloured pencils from time to time.
Fine Liner and Black Point Markers:
In architectural sketches, line weight is highly important (I’ll get into this later in this class); for this you will need drawing utensils that are of different thicknesses. Your pencils above will be perfect for your thin lines and first layer, then add a fine liner for a more permanent and dark line, and finally a black point marker for your thick lines, section cuts and ground lines.
Markers:
To give your sketches a bit of pizazz quickly or to create some depth to an image with some shadows a set of markers will do the trick. If you simply have a light grey marker most of the time it will be all you need as they are so versatile; you can find some examples of this on my TASD Instagram here. However, if you have a light blue a light green and a light brown as well as your grey you will be set for nearly all of your basic architectural sketches before you start getting into some serious artistic work with additional colours.
Different Types of Drawings
Quick Sketch:
A quick sketch is just that; a sketch that is done fast to get a thought out of your mind and on to a piece of paper. These drawings don’t need to be pretty, it’s just about getting information from your brain onto paper so you don’t forget it, so you can show someone or when you’re simply trying to work something out. These drawings can also be quick observational sketches of something that is existing; as seen below in my sketch of the Blue Lagoon in Iceland.

Parti Diagram:
A parti diagram is a simplistic representation of a bigger idea. Parti diagrams can be a group of shapes expressing an overall form of a building, a floor plan or a room layout. A simple way of looking at it is taking all details away to properly understand the ‘why’ behind a layout. These are typically done at the beginning of a design project to create a basic understanding of where you want to go with the project before going into specifics.

3D Drawing:
Orthogonal (Isometric):
Generally created using 30-degree angles, isometric drawings are one of the most common 3D drawings for representation in architecture. These are a clean and simple way to present a three dimensional object in a 2D medium (sketching).

Oblique:
Similar to Isometric drawing above, oblique drawing is simply utilising 45-degree angles rather than 30-degree to provide a wider and less tall drawing. This typically allowed for a more realistic depiction to the eye and reduces elongation of objects.

Perspective:
Perspective drawings are a great way to visual how a building or a space will look in the real world. Unlike orthogonal and oblique drawing above, perspective drawings do not use uniform angles meaning that you are able to create ‘perspective’ by allowing things in the distance to become smaller and look elongated as it would if you were actually looking at it. Perspective drawings in architecture typically comes in one, two and sometimes three-point perspective; you are unlikely to see above three point (though it can be done). The ‘number’ point refers to the number of vanishing points in the drawing; a vanishing point is the spot/s on your drawing where your lines point toward to ensure that your drawings looks right to the eye and creates a sense of being seen through a human eye. To create a sense of size to your drawing you will use a horizon line which will generally go at the eye level of the person who the drawing is being ‘seen through’, this line along with your vanishing point allows you to maintain scale in a perspective drawing. I have classes coming up that will teach you how to draw perspective drawings step-by-step so keep an eye out to learn more!
One Point Perspective:
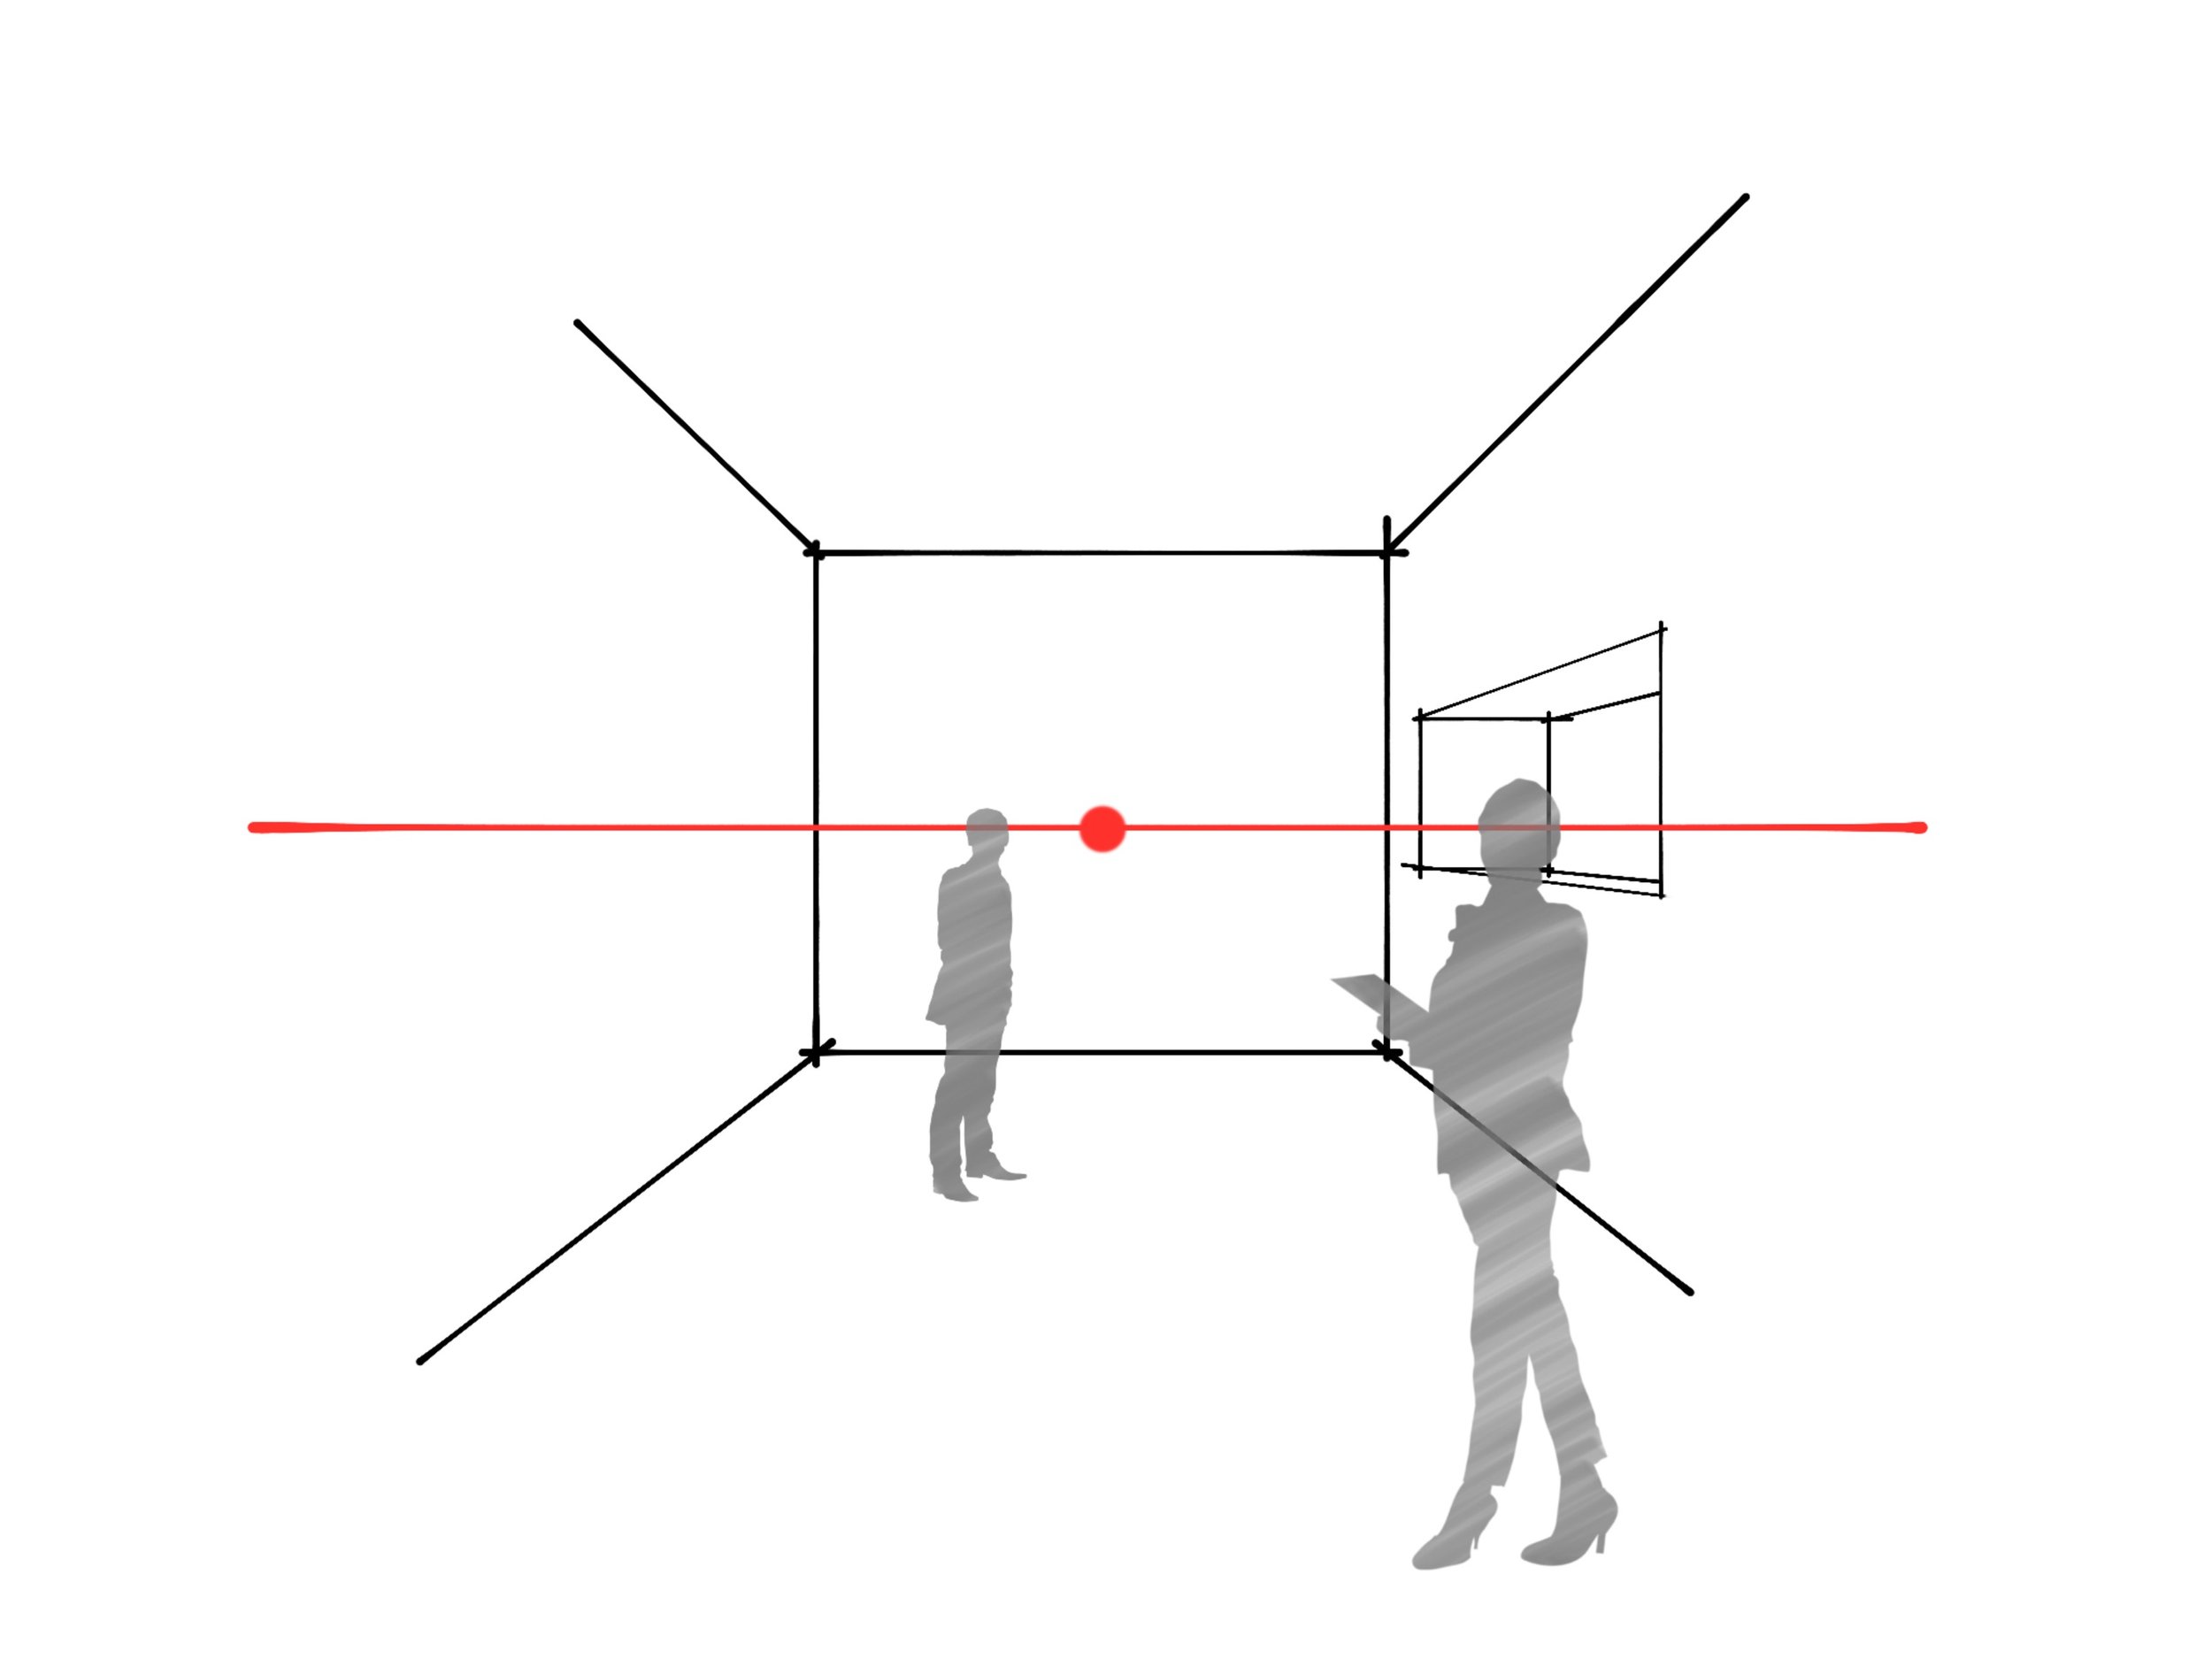
Two Point Perspective:

Three Point Perspective:

2D Drawing:
2D drawings are without question the most important drawing type in architecture as these are the drawings that bring our creations to life and actually allow them to be built. These drawings consist of plans, sections and elevations.
Plan:
A plan is a bird’s-eye-view drawing, this can be of the roof, of the overall site, and of course of the floor plan showing the layout of the rooms and spaces in the building.

Section:
A section is a drawing showing a cut through of a space to understand how the building is put together or to show the inside of the building. Pretend that you have a cake that is shaped like a building and then you slice straight through the middle with a knife, what you see on the inside of that cake is what you will see in a section. Sections are highly important because they provide detail for the construction method of a building and without them a structure could not be put together correctly. To gain even further understanding you can create a ‘detail’ which is simply a closer look at a section where you focus on one small area in more… detail.

Elevation:
An elevation is a front or side view of the building, it simply shows the exact flat view of a face of a structure as if it were just a single wall standing by itself; this shows what the building will look like. Typically, these are done in North, South, East and West views.

Now, let’s put them all together!

How to Draw a Line
Drawing a line sounds simple doesn’t it? Well, yes and no. Drawing a line is simple, but drawing a line correctly takes more thinking and process. Lines are the key to everything that an architect does as without lines, our thoughts would stay just that, thoughts. There are many different types of lines that mean different things, but I will get into this in later, more specific classes. For now, we are just focusing on a normal plain line. To draw a good line it needs to be clear and as uniform the whole way as possible; the simplest way to do this is by leaving your pen on the paper for an extra second at the start and end of a line so there is almost a blob of ink at the start and end to anker the line. Another thing that will give your drawing strength is to slightly overlap your lines at corners to ensure the corner is defined. To draw a line, many people will draw lots of little lines that almost join and overlap a bit to make one long line… DON’T DO THIS! Draw one, long line the whole way; to help you do this, don’t move and draw with your wrist, move your whole arm along the page with a stiff wrist instead. This will instantly make your lines better.

Do This!

DON’T Do This!

Do This!
DON’T Do This!
Sketching Fundamentals
There are key terms and elements of sketching that will help you not only understand how sketching works but make it easier for you to sketch better. There is a simple way to understand many of the basic elements of sketching and all you have to do is think inside the box… The eight key elements to a well rounded sketch are as bellow. You don’t always need to use every element, but if you know what each of them are and how to use them correctly there isn’t a lot more you need to know to create successful sketches:

1. Point

2. Line

3. Shape

4. Form

5. Type

6.Texture

7. Tone

8. Colour
Further to this, line weight and scale are the two key fundamentals left of sketching that I will be discussing here. I touched on line weights earlier when talking about what you will need; line weights provide hierarchy for your drawings and help show depth and meaning. A thin line in an elevation or section shows that this line is in the distance whereas a thick line is right up close including the precise line that we are cutting through. Thin lines can also be showing that this is less important in the overall drawing, but it still needs to be shown. Thick lines however show permanence and importance and are for things that we want to make sure are seen and known. The word scale is something that you will be hearing pretty much every day for the rest of your life in architecture and for good reason. Without scale, architectural drawings don’t make sense. Using scale is the way that we keep our drawings in proportion and make sure that we don’t draw a 10-story building with a person standing outside whose head is halfway to the roof; this person would roughly be 20 meters or 65 feet tall… So, in short, make sure your drawings are to scale to avoid having Goliath sized humans standing in front of your buildings.
How to Make Your Sketches Look Better
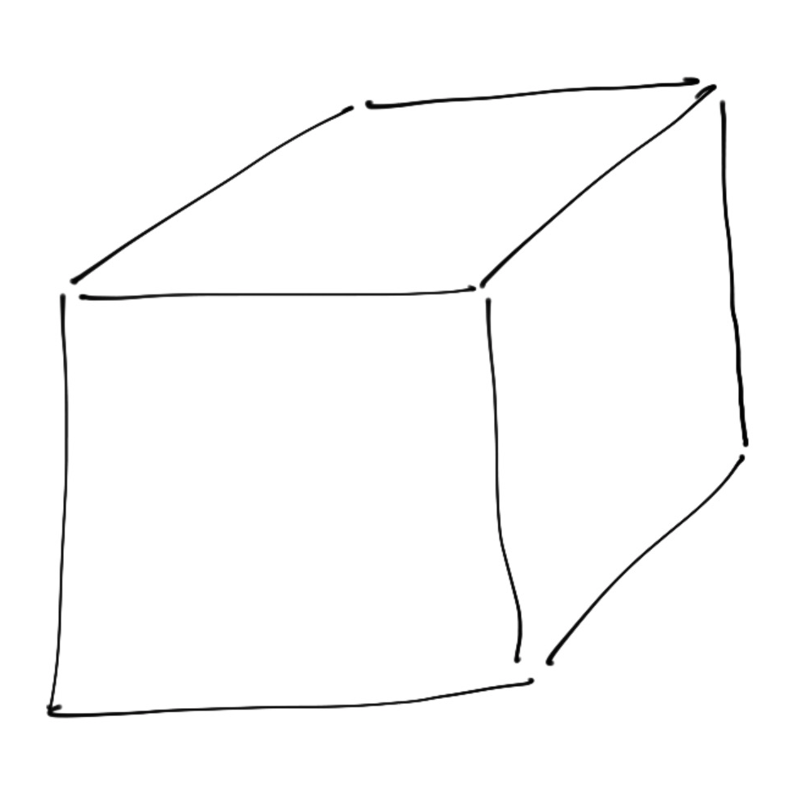
Draw the Gift Box:
When Michelangelo carved the Statue of David he started with a solid block of marble; David was always in the marble, Michelangelo just had to find him. Look at your drawings in the same way; start with simple forms like boxes and circles and find your end product by carving it out. This will make your life a lot easier and will assist you to create cleaner and more proportionate drawings.
Colour, Shading and Hatching:
A way to instantly bring life to your sketch it to add a pop of colour for some grass or a specific material, but remember that typically less is more in a sketch. Keep it simple and use colour or a hatch pattern as a way to suggest a material rather than blank in a whole area. Shading assists in making a drawing appear more realistic by giving a three-dimensional quality; there are many ways to create shading, but the key role is to present a presence of lighting in your drawing whether this be from the sun or another source.
Tip: If using trace paper and wanting to just provide a subtle flair of colour or shade, use the back of the trace paper instead of the front and the intensity of the colour will be lessened.
Outline Your Edges:
Once your drawing is looking great and finished, pick the important lines on the page and give them a final once over to ensure that they stay at the forefront of what eyes will see when they look at your drawing. Outline edges of shapes and make sure that everything is nice and crisp and clear.
Practice Makes Beautiful
I feel like I mention this in every class, so you should probably already be doing this, and so I am not going to spend a lot of time here. But the best and easiest way to make your sketching better is simply to just keep sketching. Sketch as much as you can, sketch whenever you can, wherever you can and sketch whatever you can. If you’re sitting in the kitchen and have nothing to do, sketch your toaster. Once you’ve sketched your toaster try to turn it into a building. I use this example because I have done exactly this in the past… So, keep sketching!
Below you can see my SMEG toaster to Sports Stadium Sketch!

Final Notes:
Sketching and drawing in architecture isn’t the same as it once was, it isn’t the final product before a building is constructed like it was in the time of Frank Lloyd Wright and Le Corbusier. Today some people get from their mind to a finished and constructed product without ever picking up a pencil; I personally think this is poor practice. Sketching is fast and effective whereas trying to design on a computer is clunky and limits creativity. There is most definitely still a place for sketching in architecture, it may not be the same place as it once was, but it is unarguable still an important part of the design process. Do you agree? Do you have any different thoughts on sketching or maybe you think it is time to move on and go solely computer-based design? I’m interested to hear your thoughts on the subject so please feel free to leave a comment. In the meantime, make sure you like and follow The Architecture Student Diaries on Instagram and Facebook to make sure you get first access to all new TASD content!
Ladies and Gentlemen, class dismissed.
Iain Colliver, SONA, YBA, GKIHS

All drawings and sketches in this class have been created by and are the sole property of the author of this text and are not to be reproduced or used without prior consent.